Step 1:
If the images need to be calibrated with Dark and Flat, from the appropriate function you need to indicate which Dark and Flat files you want to use and they will be applied to all the images loaded later.
ATTENTION the Dark and Flat are applied only on the video image while the file therefore remains unchanged
It is recommended to use already calibrated images because the astrometry is performed on the original imagesn the original images
OPEN FILE: Select and open image
THE CORRECTED DARK AND FLAT IMAGES CAN BE SAVED WITH THE "Save All" FUNCTION
Which will save all the images adding to the name “_P” which indicates a preprocessed image.
The images thus saved can be used for astrometry while the originals should be kept separate for any future processing
after opening the image if ghe automatic stretching was not sotisfactory you can act manually:
runs a stretching machine that may be modified with the stretching function 
Step 2:
Stars Finding: 
The " Stars finding" useful search the stars in the image and calculates the length , width and inclination , these parameters will be used in the later stages of astrometry . The program uses an average value of fondocielo that can be changed if they are not correctly find the reference stars , the values of length , width and angle found can be modified manually if you feel that may not match the automatically calculated If here 's the example fondocielo threshold is too low and must intervene manually raising it until trying again the key "new finding" will not get a better result
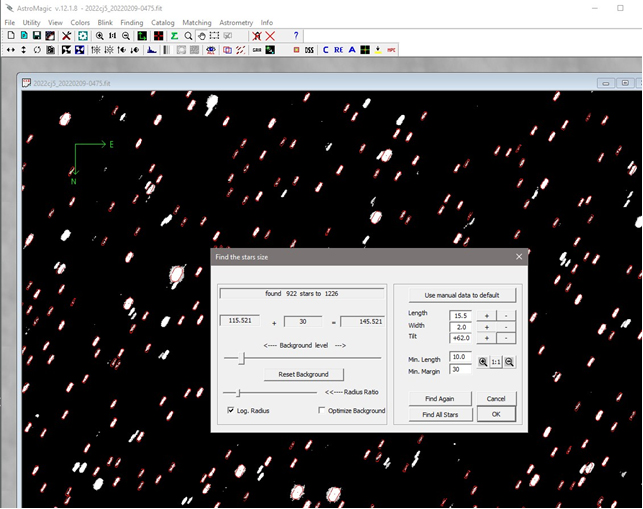
if the new development is properly detecting the stars press the OK button :
otherwise it is possible to act manually both on the background value (Slide Background level) and on the dimensions of the stars with the appropriate keys or by directly editing the values.
The "Use manual to default" button temporarily locks the parameters so that the Finding function uses the same values for subsequent loaded images as well.
Step 3:
Reading stars catalog: 
You can use either the stars catalog With the appropriate function  , you can download reference stars through a query directly from the GAIA site or from the alternative VizieR site. A file is created with the same name as the image and .GAIA extension in the same folder where the image is located. Once the file is created, it is no longer necessary to recreate it for future measurements. Verify that the plate center coordinates automatically taken from the FIT file are correct. If they are not present or you know the name of the object in the field, you can search for the coordinates through the Find Coordinate obj tool. Be careful of the limiting magnitude to avoid loading too many stars. The GAIA catalog is very accurate and often a few stars are enough for a good measurement. In the range field, a range in arcseconds is proposed that takes into account the size of the field framed, increased by an amount depending on how many maximum shift pixels have been set in the setup. It is also possible for very large images to define a box and download only the stars in the indicated rectangle.
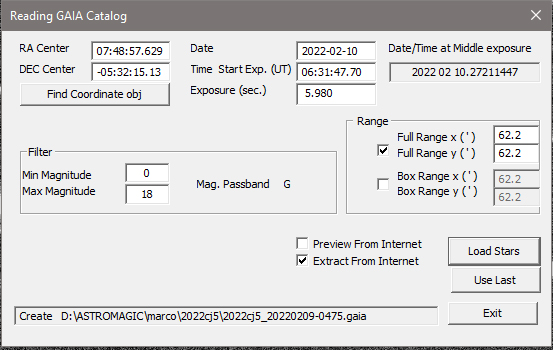
If you do not have catalogs on disk check Extract From Internet
crushing ok to read a number of stars from the catalog:
Step 4:
Matching 
matching is used to associate the star image to the reference extracted from the catalog
Also in this case you can intervene manually in case the automatic matching fails
The matching algorithm is very sensitive to possible errors in the definition of the parameters of the image especially for the pixel size , and rotation. If matching failed first is to verify the parameters ( Menu - > Utilities - > CCD Pixel Size)
Another possible error in Matching
if the image is rotated by more than 2 degrees , matching can fail if the header of the FITS file is not present the Keyword " POSANGLE " that tells the program the value of this rotation.
Step 5
Search object to be measured 
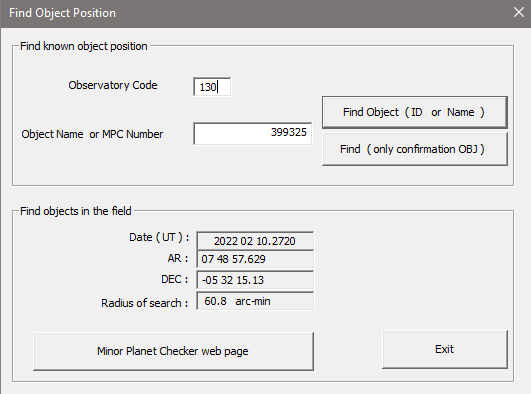
If the object to be measured is already cataloged you can use the function : “find known objec” :
in this example the object is a numbered 399325 and was observed by the observatory with code 130 , the " Find Object ( ID or Name) " will return the following values ...
The object is shown on the picture with a red cross
Step 6:
select the object to be measured.
After finding the object to be measured you must identify more precisely by clicking the right button .
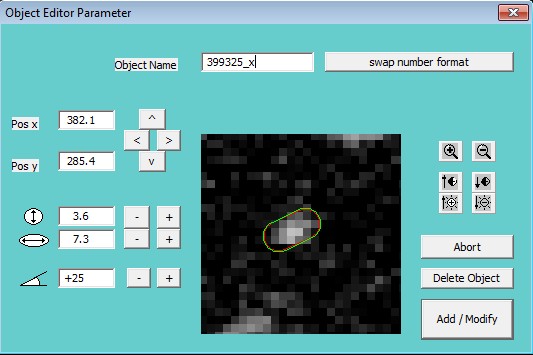
A window will appear :
Here, you specify the approximate diameter of the object and possibly its form is not circular
Step 7
ASTROMETRY 
This phase in fact consists of three steps which can be performed individually
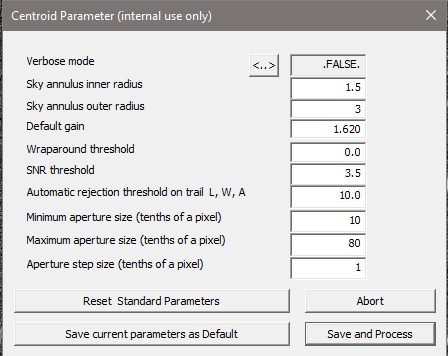
In the first step (R1), the parameters for a correct calculation of the centroids of the reference stars and the asteroid are requested. The default values are usually valid for most images, but in some cases it is advisable to modify them if the stars have pixel sizes very different from the default range.
In the first two phases, the "centroiding" of each star is performed and stars with position problems or measurement difficulties are discarded. In the third phase, the actual calculation of the object's position is performed.
The three phases can also be performed in a single pass with the " centroid and Astrometry " 
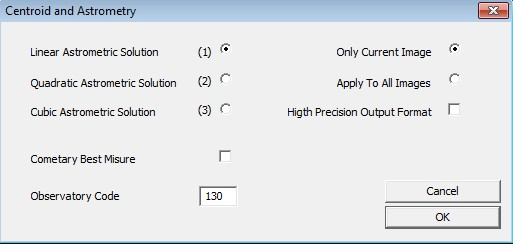
Here you can select one of three solutions astrometric ( linear , quadratic or cubic ) .
you can elaborate all images or only those in current use , as long as they have been previously prepared
Only for authorized by the Minor Planet Center you can request a format of high precision output
For the measurement of comets can indicate a system of selection of best fit through the interpolation of all the measures rather than the selection of measurement with less error
Confirming with OK will launch sequentially procedures centroid and astrometry, at this stage if the active mode " Astrometry step by step" in the setup must be confirmed with the ENTER key each step , if this mode is disabled , there are no interruptions .
The measure is ready to Be Sent to the Minor Planet Center
after astrometry can see the measures with the function of editing MPC 
mpc.mpc file in the folder where the executable astromagic.exe contains all the measures carried out by when using the program
local.mpc = files created in the folder where the file is the image contains all measurements made in that folder in the format compatible with the MPC
localx.mpc = files created in the folder where the file is the image contains all measurements made in that folder in the format that is extended with additional information astrometric
Filename.mpc= This file will have the same name of the currently in use contains the only full astrometry main object or all the tests carried out astrometry with variable radius which is then extracted the measure considered more precise .
Mpcfield.mpc = in this file are the measures of other miscellaneous items " secondary " measurement - (Not available yet)
 The " Stars finding" useful search the stars in the image and calculates the length , width and inclination , these parameters will be used in the later stages of astrometry .
, you can download reference stars through a query directly from the GAIA site or from the alternative VizieR site. A file is created with the same name as the image and .GAIA extension in the same folder where the image is located. Once the file is created, it is no longer necessary to recreate it for future measurements. Verify that the plate center coordinates automatically taken from the FIT file are correct. If they are not present or you know the name of the object in the field, you can search for the coordinates through the Find Coordinate obj tool. Be careful of the limiting magnitude to avoid loading too many stars. The GAIA catalog is very accurate and often a few stars are enough for a good measurement. In the range field, a range in arcseconds is proposed that takes into account the size of the field framed, increased by an amount depending on how many maximum shift pixels have been set in the setup. It is also possible for very large images to define a box and download only the stars in the indicated rectangle.
If you do not have catalogs on disk check Extract From Internetcrushing ok to read a number of stars from the catalog:Step 4:Matchingmatching is used to associate the star image to the reference extracted from the catalogAlso in this case you can intervene manually in case the automatic matching failsThe matching algorithm is very sensitive to possible errors in the definition of the parameters of the image especially for the pixel size , and rotation. If matching failed first is to verify the parameters ( Menu - > Utilities - > CCD Pixel Size) Another possible error in Matchingif the image is rotated by more than 2 degrees , matching can fail if the header of the FITS file is not present the Keyword " POSANGLE " that tells the program the value of this rotation.Step 5Search object to be measuredIf the object to be measured is already cataloged you can use the function : “find known objec” :in this example the object is a numbered 399325 and was observed by the observatory with code 130 , the " Find Object ( ID or Name) " will return the following values ...The object is shown on the picture with a red crossStep 6:select the object to be measured.After finding the object to be measured you must identify more precisely by clicking the right button .A window will appear :Here, you specify the approximate diameter of the object and possibly its form is not circularStep 7ASTROMETRY
 Here you can select one of three solutions astrometric ( linear , quadratic or cubic ) .you can elaborate all images or only those in current use , as long as they have been previously preparedOnly for authorized by the Minor Planet Center you can request a format of high precision outputFor the measurement of comets can indicate a system of selection of best fit through the interpolation of all the measures rather than the selection of measurement with less errorConfirming with OK will launch sequentially procedures centroid and astrometry, at this stage if the active mode " Astrometry step by step" in the setup must be confirmed with the ENTER key each step , if this mode is disabled , there are no interruptions .The measure is ready to Be Sent to the Minor Planet Centerafter astrometry can see the measures with the function of editing MPC


